

Best answer
TronicalTune · Online Manual 3.56
English sourceFind answers. Keep playing.
Search by question, symptom, function, or button sequence.
34concise answers
6clear sections
ENsource language
Popular:
Browse all topicsChoose a section or ask a question above.
No direct match yet.
Try a shorter phrase, a symptom, a button name, or a common translated term.
Getting started
7 topics
01 What is included?Your set contains six RoboHeads, the Contacting PCB, a rechargeable LiPo battery, a USB charging cable, seven lock nuts and washers, and the supplied wrench. UPDATED
Your set contains six RoboHeads, the Contacting PCB, a rechargeable LiPo battery, a USB charging cable, seven lock nuts and washers, and the supplied wrench.
- Check all parts before removing your guitar's original tuners.
- Keep the supplied wrench and one small coin ready for installation.
Good to knowThe exact RoboHead layout depends on the TronicalTune type ordered for your guitar.
6×RoboHeads
PCBContacting plate
LiPoBattery
USBCharging cable
7×Locks & washers
1×Wrench
Current package · Manual 3.56
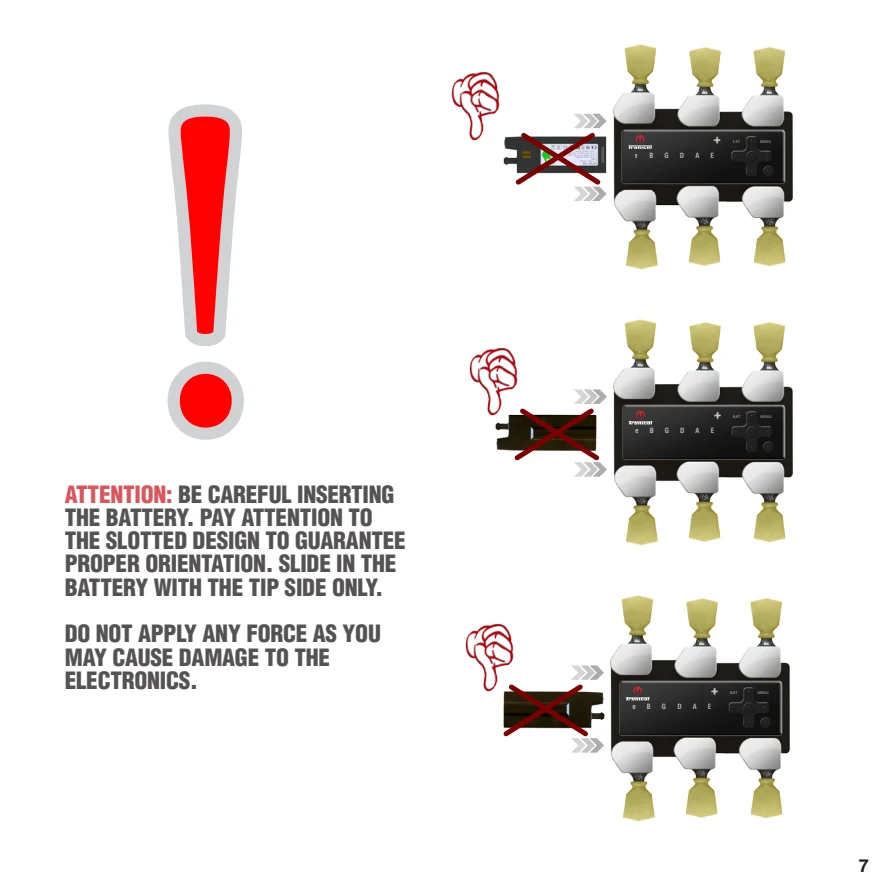
02 Insert the batterySlide the battery into the controller tip-first and in the orientation defined by the slotted housing. P. 7
Slide the battery into the controller tip-first and in the orientation defined by the slotted housing.
- Check the slot and tip orientation.
- Slide the tip side into the battery bay.
- Stop if resistance is unusually high; do not force it.
Good to knowIncorrect orientation or excessive force can damage the electronics.
 View source page ↗
03 Charge the battery with the USB cableConnect the battery to the supplied USB charging cable. Its LED lights red while charging and switches off when charging is complete or no battery is connected. UPDATED
Connect the battery to the supplied USB charging cable. Its LED lights red while charging and switches off when charging is complete or no battery is connected.
- Connect the battery firmly to the supplied USB charging cable.
- Connect the USB plug to a suitable USB power source.
- A red cable LED confirms that the battery is charging.
- When the LED switches off, charging is complete - or no battery is connected.
Good to knowIf the LED stays off from the start, check the battery connection before assuming the battery is fully charged.
USBLEDBAT
RedBattery is charging
OffCharged or no battery
USB charging cable · Current behavior
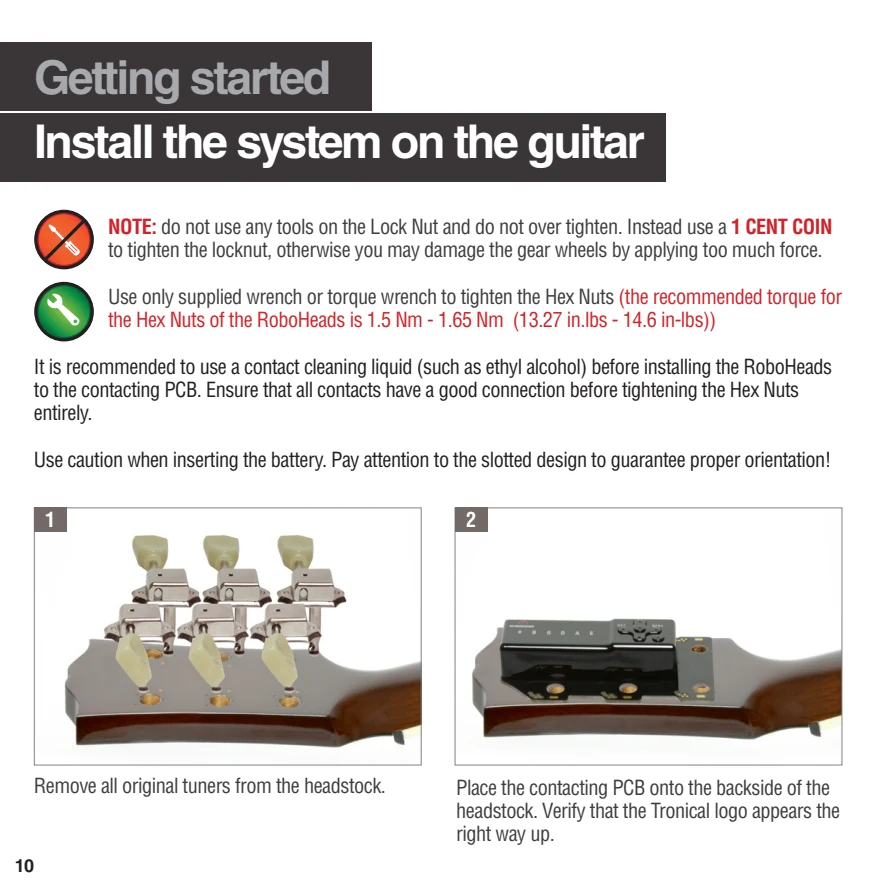
04 Install the system on the guitarRemove the original tuners, place the Contacting PCB on the rear of the headstock, insert the RoboHeads, then fit the washers and hex nuts. P. 10-11
Remove the original tuners, place the Contacting PCB on the rear of the headstock, insert the RoboHeads, then fit the washers and hex nuts.
- Remove the guitar's original machine heads.
- Align the PCB so all holes match and the Tronical logo is upright.
- Insert the RoboHeads through the tuner holes.
- Fit washers and hex nuts, then tighten with the supplied wrench to 1.5-1.65 Nm.
Good to knowUse a coin - never a tool - on the lock nuts. Do not overtighten.
 View source page ↗
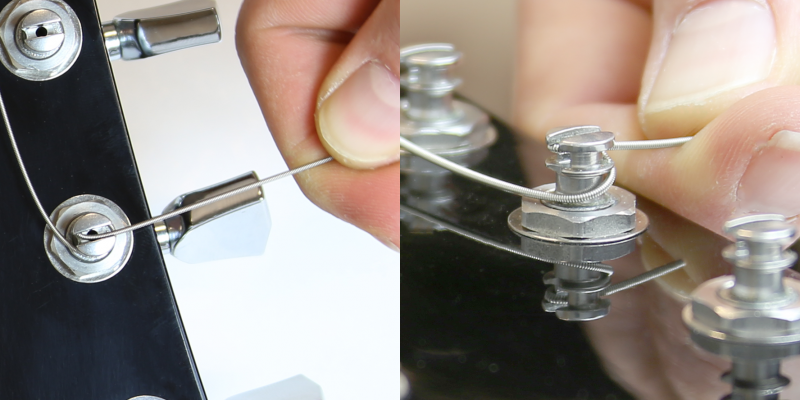
05 Lock strings with SLS or Lock NutsUse the SLS slots for a wrap-free mechanical lock, or secure a standard post with one tidy wrap and its Lock Nut. ONLINE
Use the SLS slots for a wrap-free mechanical lock, or secure a standard post with one tidy wrap and its Lock Nut.
- Choose the method fitted to your RoboHeads: SLS has two slotted recesses; the standard system has a threaded Lock Nut.
- SLS: keep tension, make a half-turn in the lower recess, guide the string to the upper slot, bend it firmly and trim it. Use a figure-eight in the upper slot for thin strings.
- Lock Nut, bass side: make a lower half-turn, guide the string upward and wrap once clockwise around the thread; use two turns for thin strings.
- Lock Nut, treble side: follow the same steps in the mirrored winding direction.
- Tighten the Lock Nut by hand and trim the string. Use a 1-cent coin only when a little more grip is necessary.
Good to knowNever use a screwdriver, pliers, or a string winder on a Lock Nut. Hand-tight is normally sufficient; maximum recommended torque is 1.0 Nm.
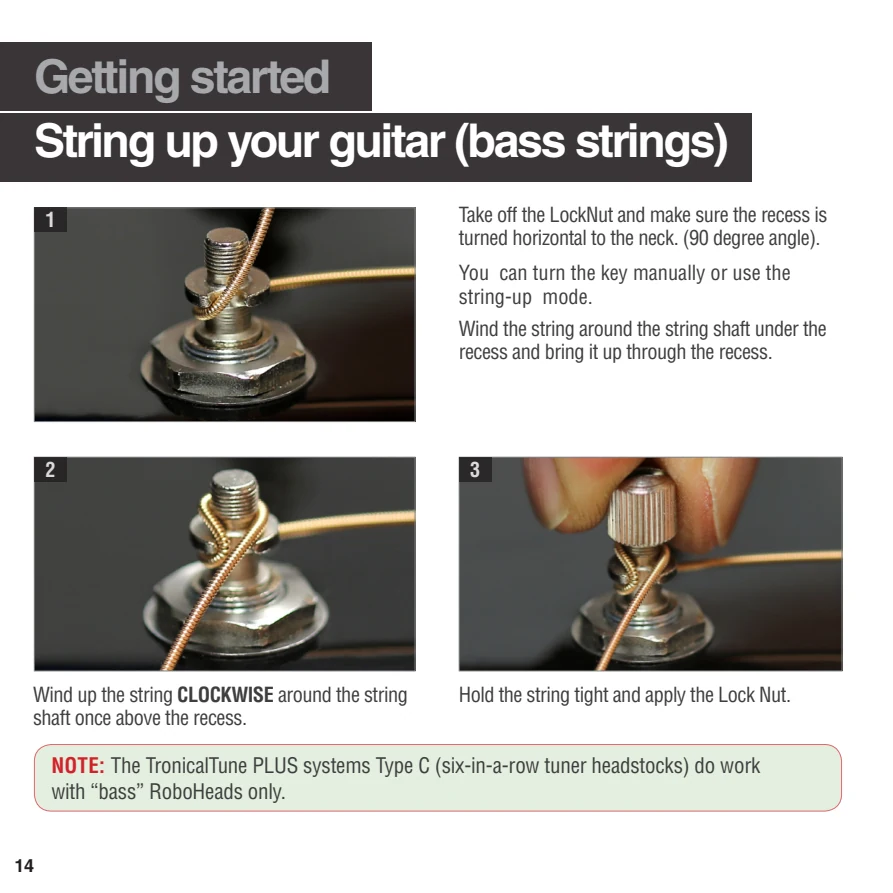
06 Fit bass stringsGuide the string beneath the recess, bring it up through the recess, then make one clockwise winding above it before tightening the lock nut. P. 14-15
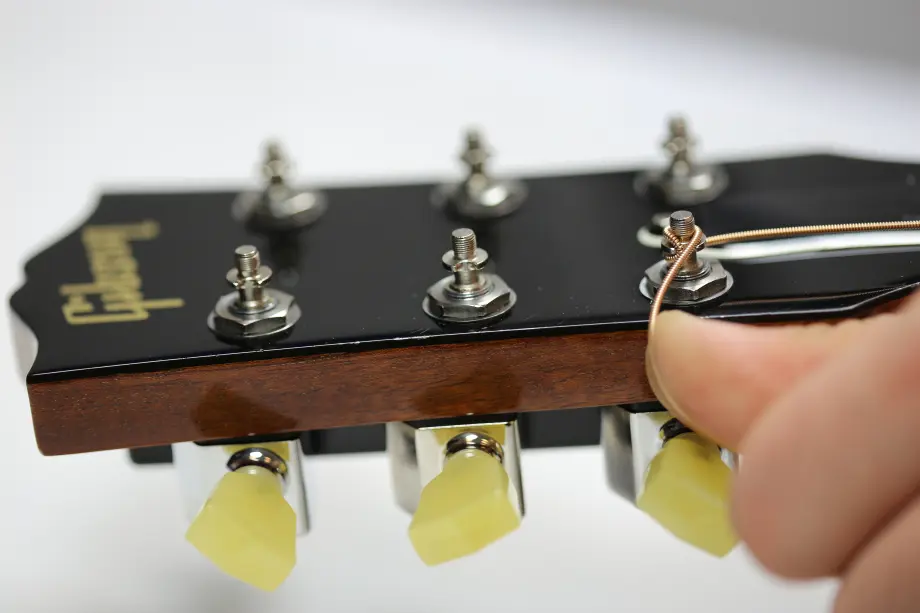
Guide the string beneath the recess, bring it up through the recess, then make one clockwise winding above it before tightening the lock nut.
- Turn the recess to a 90-degree angle to the neck.
- Guide the string under and then through the recess.
- Keep tension on the string and wind once clockwise above the recess.
- Tighten the lock nut gently with a small coin and cut the excess string.
Good to knowMaximum recommended lock-nut torque is 1.0 Nm. Do not use pliers or a string-winding tool.
 View source page ↗
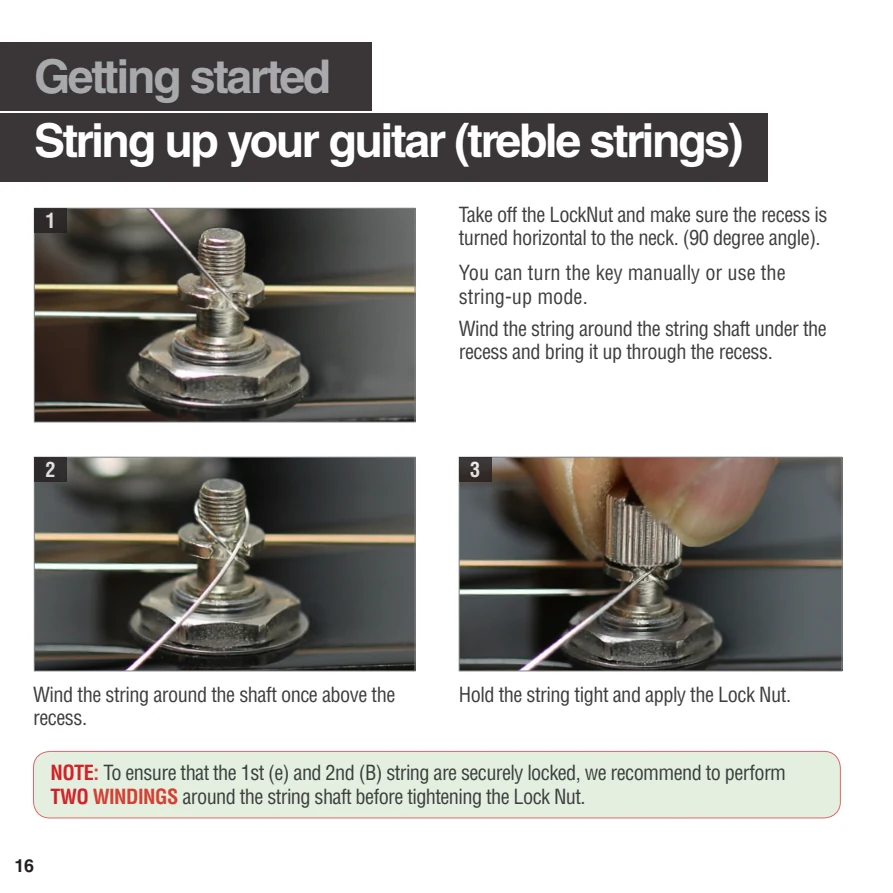
07 Fit treble stringsTreble strings follow the same locking method, but the high e and B strings should be wrapped twice around the shaft for secure locking. P. 16-17
Treble strings follow the same locking method, but the high e and B strings should be wrapped twice around the shaft for secure locking.
- Turn the recess to a 90-degree angle to the neck.
- Guide the string beneath and up through the recess.
- Wind the high e and B strings twice around the shaft.
- Tighten gently with a coin and cut the excess string.
Good to knowDo not overtighten the lock nut; maximum recommended torque is 1.0 Nm.
 View source page ↗
Tuning
5 topics
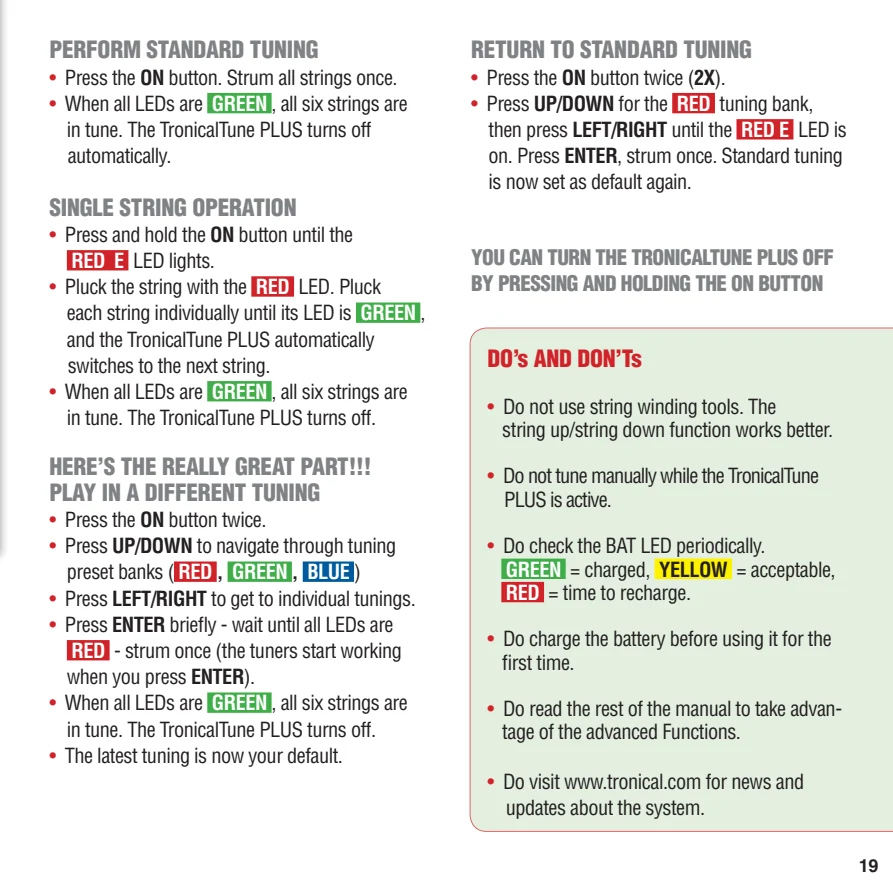
01 Tune to Standard EPress ON once and strum all strings in one clean motion. Green LEDs mean the corresponding strings are in tune. P. 19
Press ON once and strum all strings in one clean motion. Green LEDs mean the corresponding strings are in tune.
- Press ON once.
- Strum all six strings together.
- Mute strings that already show green.
- Pluck only remaining red strings until all LEDs are green; the system then switches off.
Good to knowLet the strings ring for several seconds. Muting them too early can interrupt measurement.
 View source page ↗
02 Use Single-String ModeSingle-String Mode measures one string at a time and is the more robust option in loud environments. P. 19
Single-String Mode measures one string at a time and is the more robust option in loud environments.
- Press and hold ON until the red E LED lights.
- Pluck only the string whose LED is red.
- Continue until that LED turns green; the next string is selected automatically.
- Repeat until all six LEDs are green.
Good to knowChoose this mode when stage noise, vibration, or other strings interfere with tuning.
View source page ↗
03 Select a different tuningPress ON twice, choose a colored tuning bank with UP/DOWN, choose a preset with LEFT/RIGHT, then press ENTER and strum. P. 19
Press ON twice, choose a colored tuning bank with UP/DOWN, choose a preset with LEFT/RIGHT, then press ENTER and strum.
- Press ON twice.
- Use UP/DOWN to select the red, green, or blue bank.
- Use LEFT/RIGHT to select the tuning.
- Press ENTER, wait for red string LEDs, then strum.
Good to knowThe last completed tuning becomes the default for the next switch-on.
View source page ↗
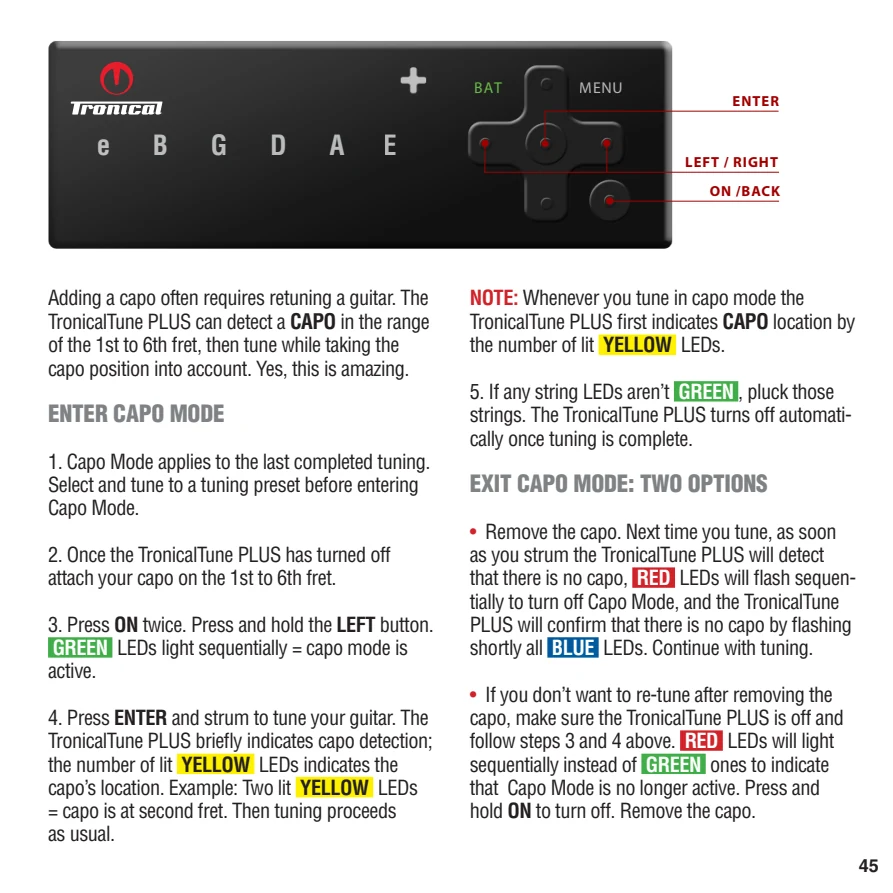
04 Tune with a capoCapo Mode detects a capo between frets 1 and 6 and tunes relative to its position. P. 45
Capo Mode detects a capo between frets 1 and 6 and tunes relative to its position.
- Complete the desired base tuning, then switch off.
- Attach the capo between fret 1 and 6.
- Press ON twice and hold LEFT until green LEDs run sequentially.
- Press ENTER and strum; yellow LEDs briefly show the detected fret.
Good to knowAfter removing the capo, the system can detect its absence during the next tuning and exit Capo Mode.
 View source page ↗
05 Teach in tuning changes: Standard E ↔ E♭TronicalTune adapts its motor corrections during tuning. Practical tip: switching between the same two tunings three or four times can make subsequent changes faster and more accurate, with fewer corrective movements. E ↔ E♭
TronicalTune adapts its motor corrections during tuning. Practical tip: switching between the same two tunings three or four times can make subsequent changes faster and more accurate, with fewer corrective movements.
- Start with the guitar fully tuned to Standard E.
- Select E♭ (all six strings one semitone lower), tune and let the process finish completely: all strings confirmed green, then automatic switch-off.
- Switch back to Standard E and again let tuning finish completely.
- Repeat this back-and-forth cycle three or four times. Only then start playing or select another tuning. After changing strings or the guitar setup, recalibrate as needed and repeat this practice.
Good to knowThe 3–4-cycle recommendation is based on practical experience, not a guaranteed improvement for every guitar. Learning refines motor positioning; the system must still measure and confirm pitch on every tuning. Calibration adapts signal detection and Gain and is a separate process.
Tunings & presets
6 topics
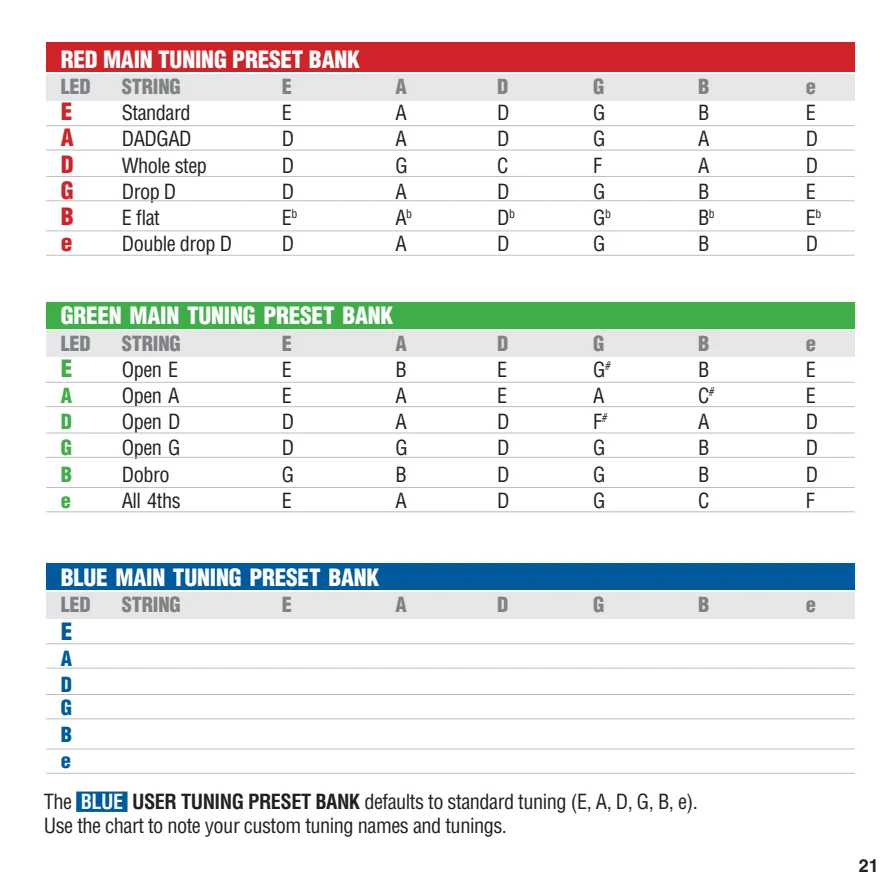
01 Factory tuning presetsThe red bank contains Standard E, DADGAD, whole-step down, Drop D, E-flat, and Double Drop D. The green bank contains six open or alternate tunings. P. 21
The red bank contains Standard E, DADGAD, whole-step down, Drop D, E-flat, and Double Drop D. The green bank contains six open or alternate tunings.
- Choose the bank with UP/DOWN.
- Choose the preset position E, A, D, G, B, or e with LEFT/RIGHT.
- Press ENTER and strum to load it.
Good to knowThe blue bank is reserved for your own tunings and initially contains Standard E in all six slots.
 View source page ↗
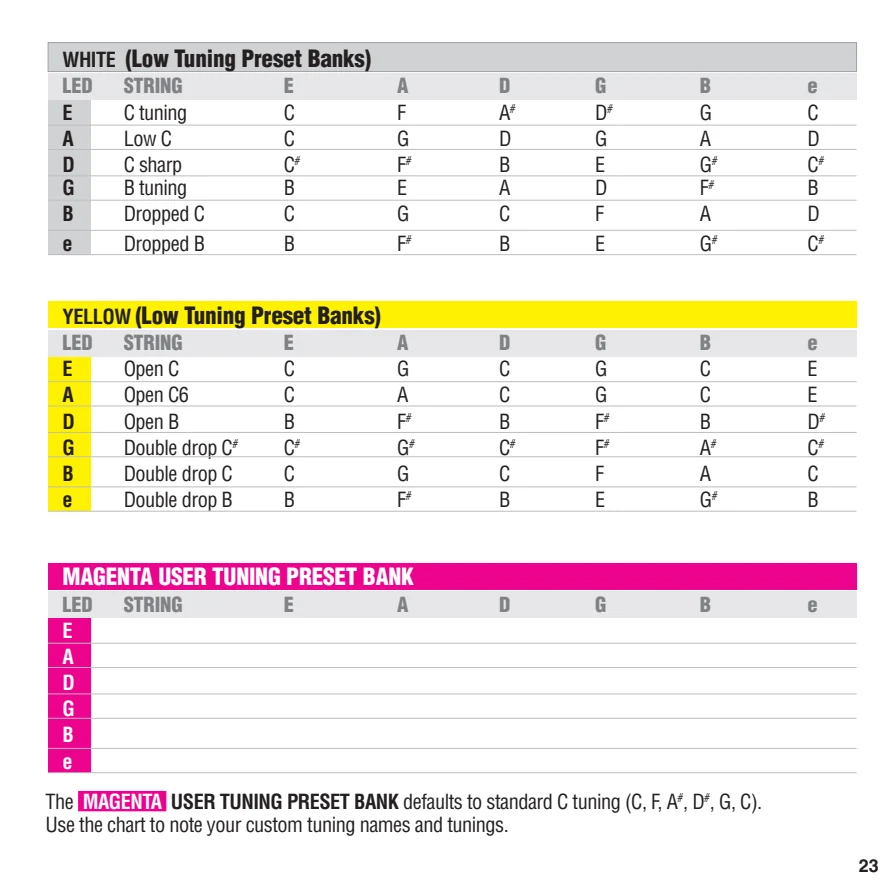
02 Low-tuning presetsWhite and yellow banks provide low tunings such as C, B, Dropped C, Dropped B, Open C, and Double Drop tunings. The magenta bank stores low custom tunings. P. 23
White and yellow banks provide low tunings such as C, B, Dropped C, Dropped B, Open C, and Double Drop tunings. The magenta bank stores low custom tunings.
- Activate the additional banks in the yellow advanced category.
- Use heavier strings suitable for the selected low tuning.
- Select white, yellow, or magenta with UP/DOWN during tuning selection.
Good to knowLow tunings require suitable string gauges and may need a slower RoboHead speed.
 View source page ↗
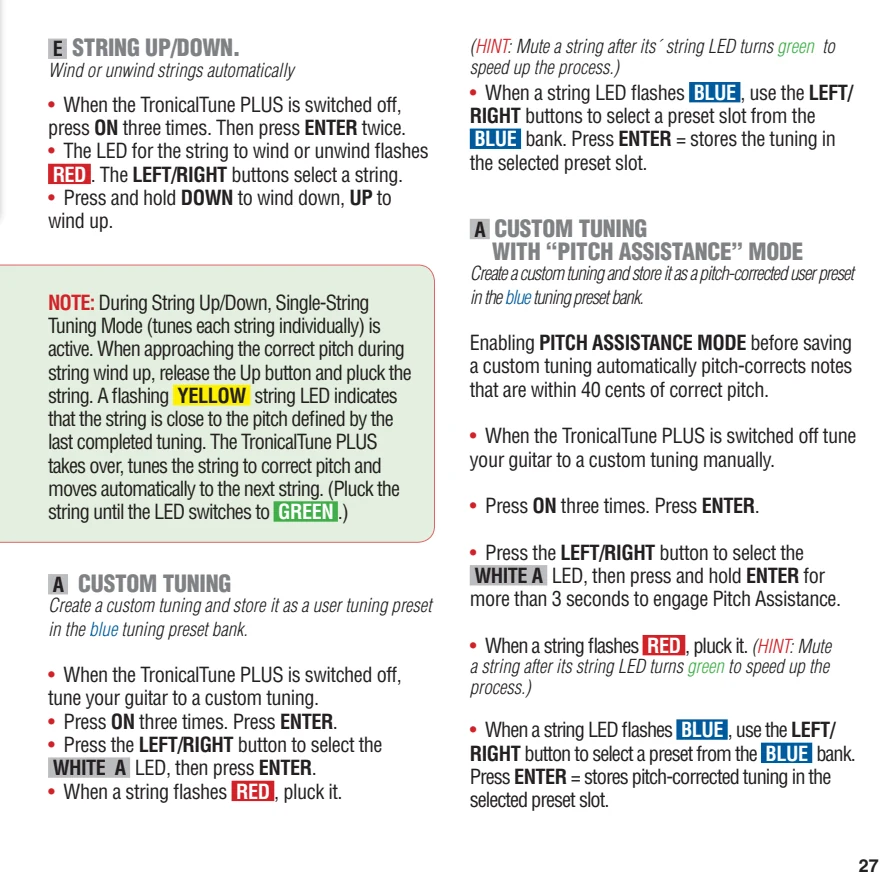
03 Create and save a custom tuningFirst tune the guitar manually to the desired notes, then let TronicalTune measure each string and save the result in a blue preset slot. P. 27
First tune the guitar manually to the desired notes, then let TronicalTune measure each string and save the result in a blue preset slot.
- Tune the guitar to your desired custom tuning.
- Press ON three times, press ENTER, select white A, then press ENTER.
- Pluck each red-indicated string and mute it after its LED turns green.
- Choose a blue slot with LEFT/RIGHT and press ENTER to save.
Good to knowHold ENTER for more than three seconds when selecting white A to enable Pitch Assistance for notes within 40 cents.
 View source page ↗
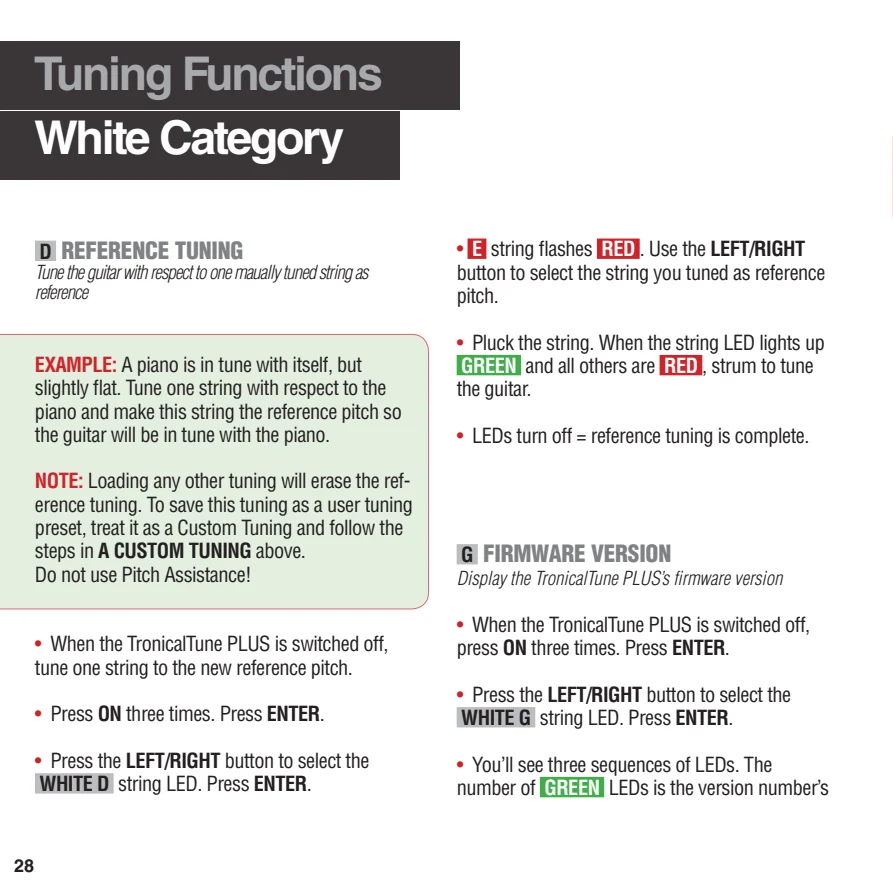
04 Tune to an external referenceReference Tuning uses one manually matched string as the pitch reference, useful when playing with an instrument that is in tune with itself but slightly sharp or flat. P. 28
Reference Tuning uses one manually matched string as the pitch reference, useful when playing with an instrument that is in tune with itself but slightly sharp or flat.
- Match one guitar string manually to the external instrument.
- Press ON three times, choose white D, then press ENTER.
- Select the reference string with LEFT/RIGHT and press ENTER.
- Tune the remaining strings normally.
Good to knowLoading another preset removes the temporary reference. Save it as a custom tuning if you need it again.
 View source page ↗
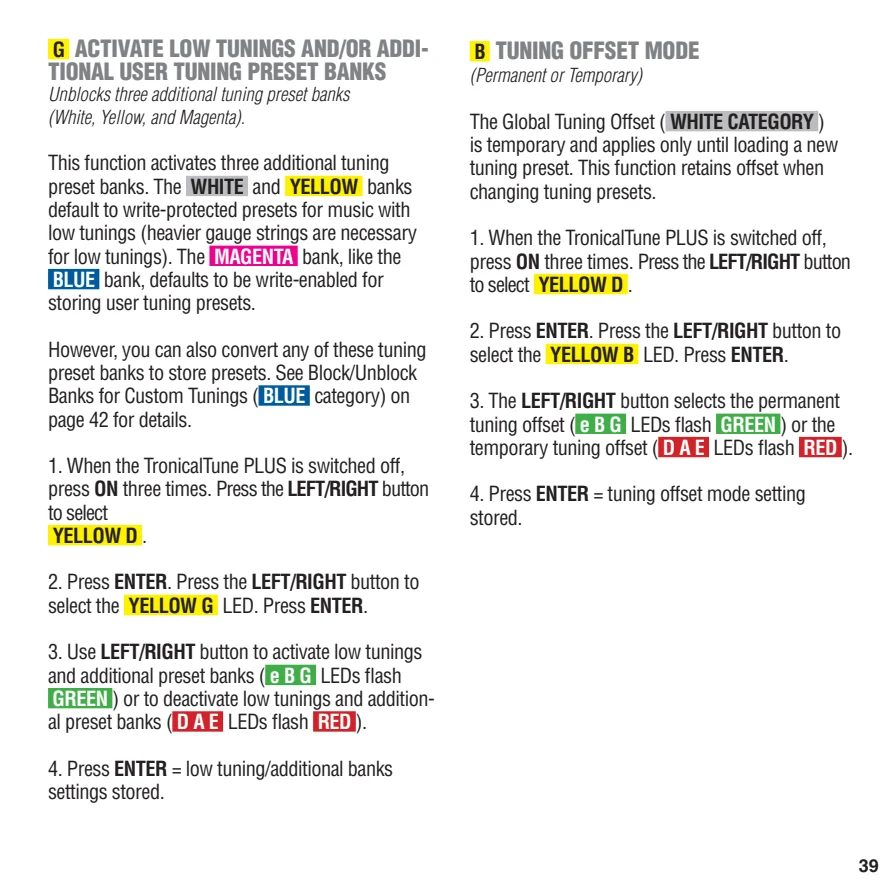
05 Activate the white, yellow, and magenta banksUnlock the three additional banks from the yellow G function to access low-tuning presets and another custom-tuning bank. P. 39
Unlock the three additional banks from the yellow G function to access low-tuning presets and another custom-tuning bank.
- Press ON three times and select yellow D.
- Select yellow G and press ENTER.
- Choose activation so the e, B, and G LEDs flash green.
- Press ENTER to store.
Good to knowWhite and yellow contain protected low-tuning presets; magenta is write-enabled for custom tunings.
 View source page ↗
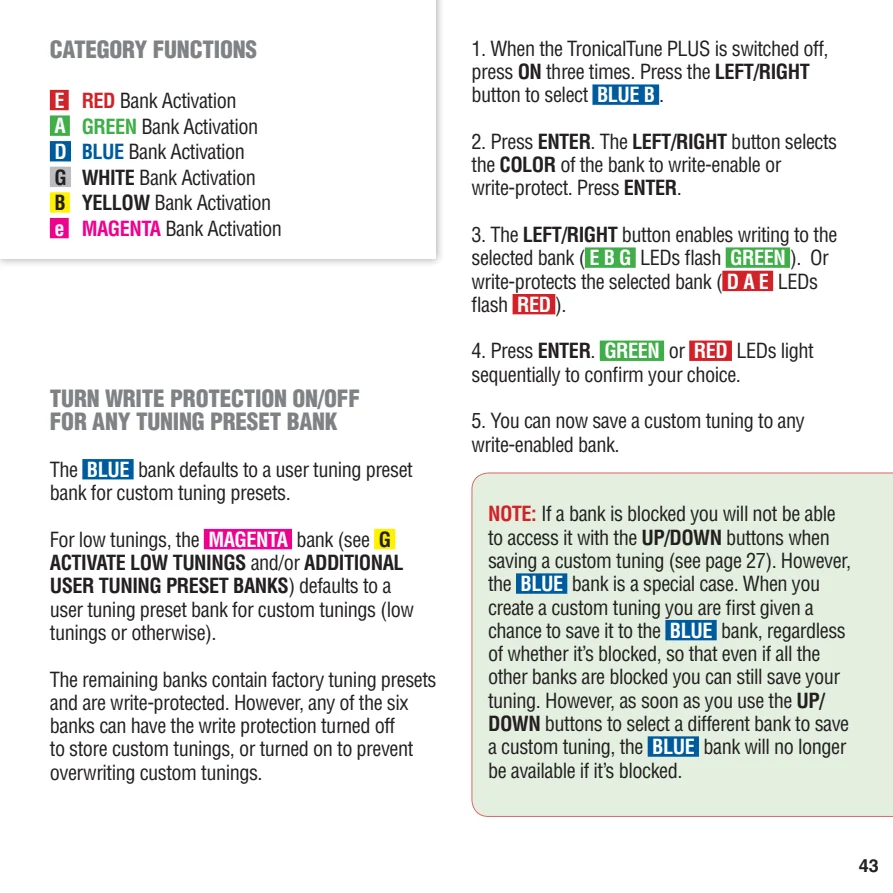
06 Unlock a bank for custom tuningsAny of the six banks can be write-enabled for custom presets or write-protected against accidental changes. P. 43
Any of the six banks can be write-enabled for custom presets or write-protected against accidental changes.
- Press ON three times and select blue B.
- Press ENTER and choose the bank color.
- Choose green LEDs to enable writing or red LEDs to protect it.
- Press ENTER and wait for confirmation.
Good to knowChanging factory-bank write protection can allow factory presets to be overwritten.
 View source page ↗
Advanced settings
11 topics
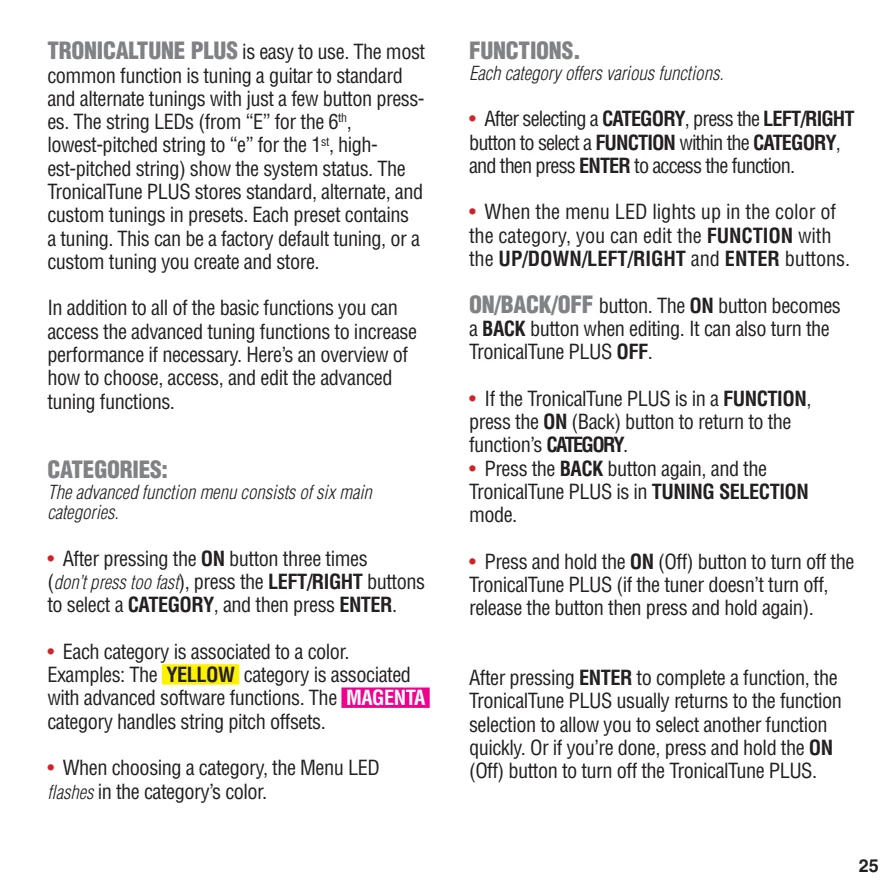
01 Navigate the advanced menuPress ON three times to enter the advanced menu. LEFT/RIGHT chooses a colored category, ENTER opens it, and LEFT/RIGHT then chooses a function. P. 24-26
Press ON three times to enter the advanced menu. LEFT/RIGHT chooses a colored category, ENTER opens it, and LEFT/RIGHT then chooses a function.
- Press ON three times, not too quickly.
- Choose a category with LEFT/RIGHT and press ENTER.
- Choose a function with LEFT/RIGHT and press ENTER.
- Use ON as BACK; press and hold ON to switch off.
Good to knowThe menu LED color identifies the current category.
 View source page ↗
02 Automatic String Up/DownThe white E function winds or unwinds a selected string automatically, replacing a separate string winder. P. 27
The white E function winds or unwinds a selected string automatically, replacing a separate string winder.
- With the system off, press ON three times.
- Press ENTER twice.
- Select the string with LEFT/RIGHT.
- Hold DOWN to unwind or UP to wind.
- Near pitch, release UP and pluck; the tuner finishes automatically.
Good to knowDo not tune manually while TronicalTune is active.
View source page ↗
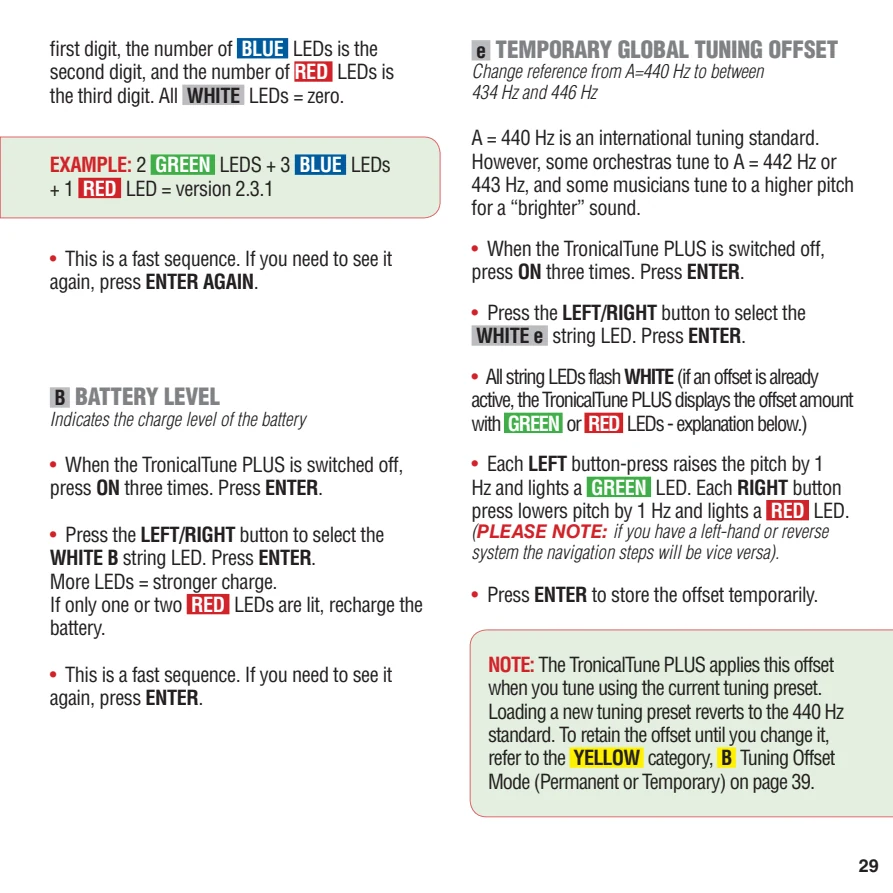
03 Check the battery levelThe battery-level function displays the remaining charge on the six string LEDs; more lit LEDs means more capacity. P. 29
The battery-level function displays the remaining charge on the six string LEDs; more lit LEDs means more capacity.
- Press ON three times.
- Select the white category and the B function.
- Read the displayed level, then press BACK or switch off.
Good to knowA red BAT LED during normal use means it is time to recharge.
 View source page ↗
04 Apply a global tuning offsetA global offset shifts all six strings together in one-cent steps, useful when matching a slightly sharp or flat reference pitch. P. 29, 39
A global offset shifts all six strings together in one-cent steps, useful when matching a slightly sharp or flat reference pitch.
- Load and complete the tuning you want to offset.
- Open the white e function.
- Use LEFT/RIGHT to adjust the offset in one-cent steps.
- Press ENTER to store the setting.
Good to knowThe offset is temporary by default. The yellow B function can make it persist when presets change.
View source page ↗
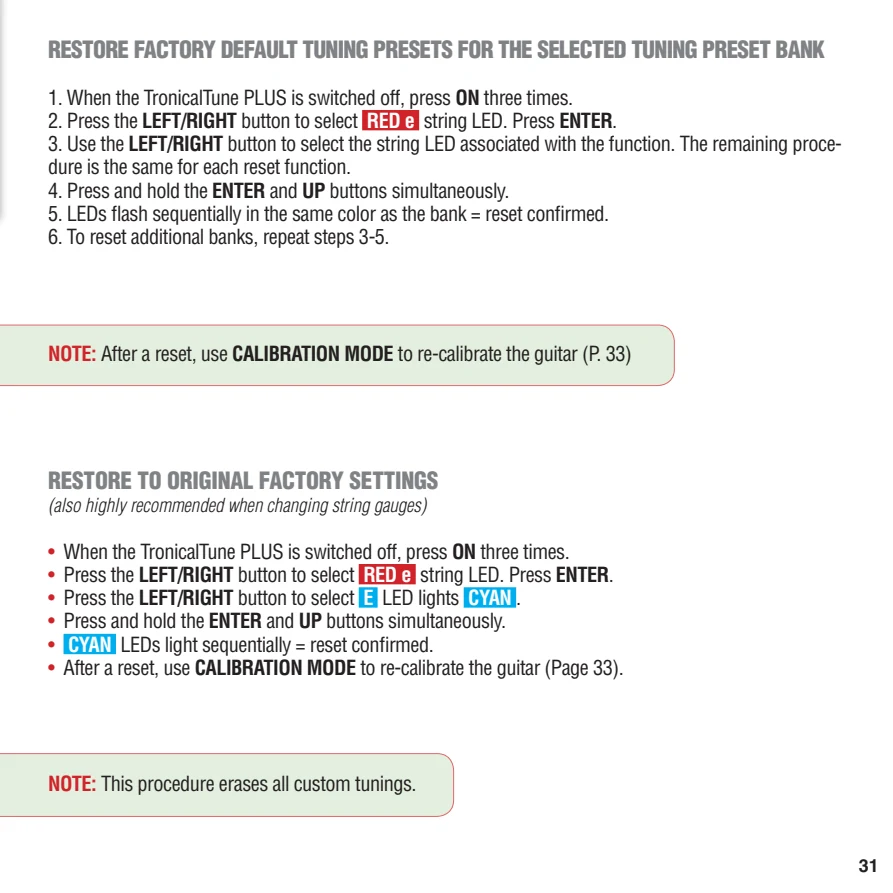
05 Restore factory settingsThe red reset category can restore individual preset banks or reset the complete system to its original factory settings. P. 30-31
The red reset category can restore individual preset banks or reset the complete system to its original factory settings.
- Press ON three times and select red e.
- Press ENTER and select the required reset function.
- Hold ENTER and UP simultaneously.
- Wait for the sequential LED confirmation, then recalibrate.
Good to knowA full factory reset erases all custom tunings.
 View source page ↗
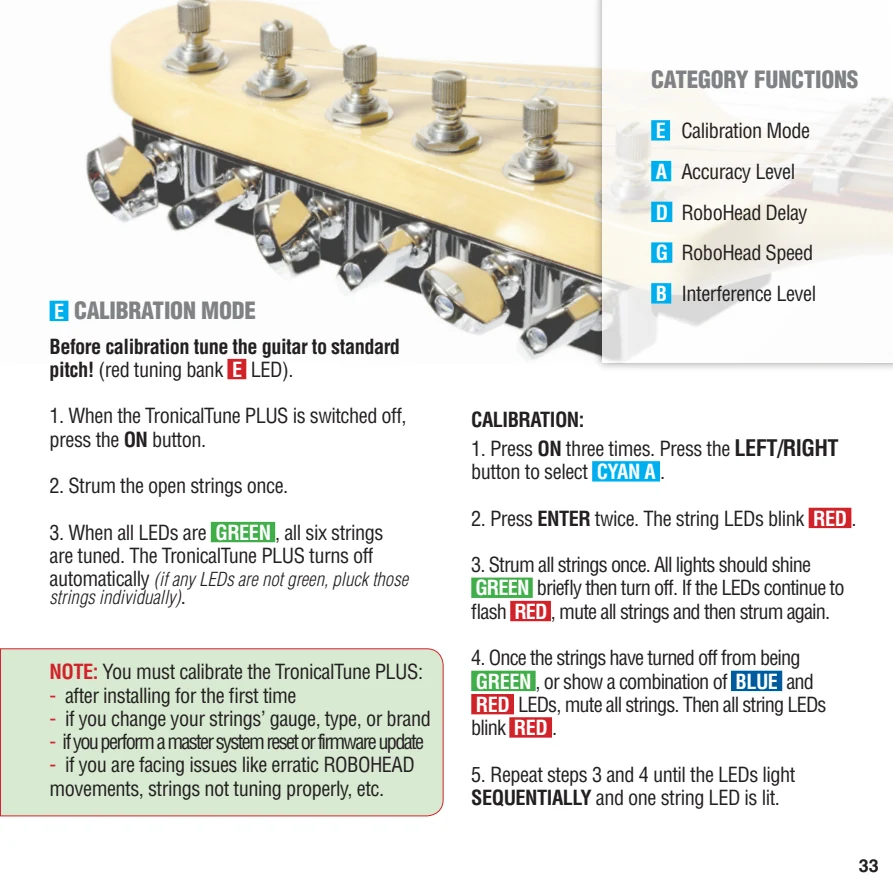
06 Calibrate each string — guided calibrationFor firmware 3.56 builds with guided single-string calibration: the system measures every string separately and adjusts input Gain and frequency-dependent signal correction to your guitar’s internal piezo signal. Run calibration after installation, a string-gauge/type change, a reset or firmware update, or if detection becomes unreliable. FW 3.56
For firmware 3.56 builds with guided single-string calibration: the system measures every string separately and adjusts input Gain and frequency-dependent signal correction to your guitar’s internal piezo signal. Run calibration after installation, a string-gauge/type change, a reset or firmware update, or if detection becomes unreliable.
- First tune to Standard E (E–A–D–G–B–e). Remove any capo, hold the guitar in your normal playing position and mute all strings.
- From power off, press ON three times. Use LEFT/RIGHT to select the cyan A Tweaks menu and press ENTER. Select E (Calibration Mode) and press ENTER.
- Pluck only the string whose LED blinks red, with a normal, controlled attack. Keep all other strings muted. The order is low E, A, D, G, B, high e.
- Let the note ring until the measurement feedback. Green flashes confirm an accepted measurement; red feedback means try the same string again. Then mute all strings and wait for the next red blinking prompt.
- Provide two accepted plucks per string: 12 accepted measurements in total. During the muting pause, completed strings can appear blue. Follow the indicated string rather than counting every pluck.
- Wait for the final LED sequence and green confirmation flashes. Only the fully completed calibration is saved. Pressing a button aborts the procedure; restart if interrupted. Afterwards, check normal tuning.
Good to knowOlder firmware uses an all-string strum-and-mute procedure instead. These individual-string steps apply only when your firmware prompts one string at a time. Calibration is not a separate Gain control for each string and does not replace tuning-change learning.
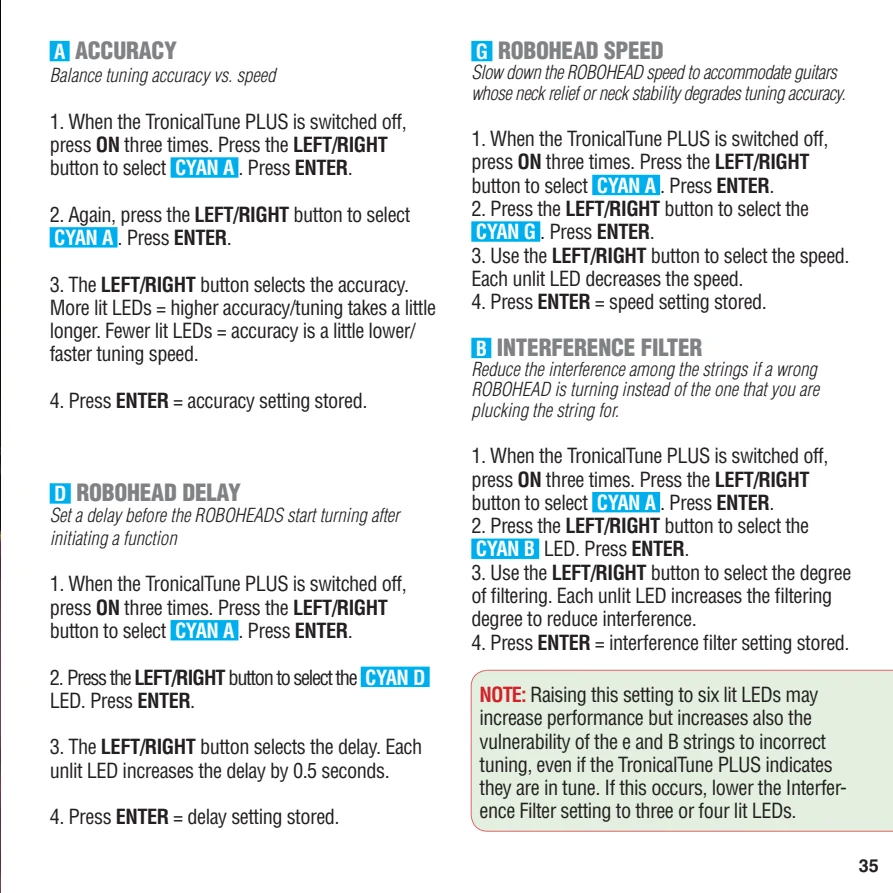
07 Balance accuracy and tuning speedThe cyan A setting trades speed against precision: more lit LEDs increase accuracy but may make tuning take slightly longer. P. 35
The cyan A setting trades speed against precision: more lit LEDs increase accuracy but may make tuning take slightly longer.
- Press ON three times and select cyan A.
- Choose cyan A again and press ENTER.
- Use LEFT/RIGHT to select the accuracy level.
- Press ENTER to store.
Good to knowStart with the default and increase accuracy only when needed.
 View source page ↗
08 Adjust RoboHead delay or speedAdd a start delay with cyan D, or reduce motor speed with cyan G if neck movement or instrument stability reduces tuning accuracy. P. 35
Add a start delay with cyan D, or reduce motor speed with cyan G if neck movement or instrument stability reduces tuning accuracy.
- Open the cyan advanced-hardware category.
- Choose D for delay or G for speed.
- Use LEFT/RIGHT to change the amount.
- Press ENTER to save.
Good to knowEach unlit delay LED adds 0.5 seconds; fewer lit speed LEDs mean slower RoboHead movement.
View source page ↗
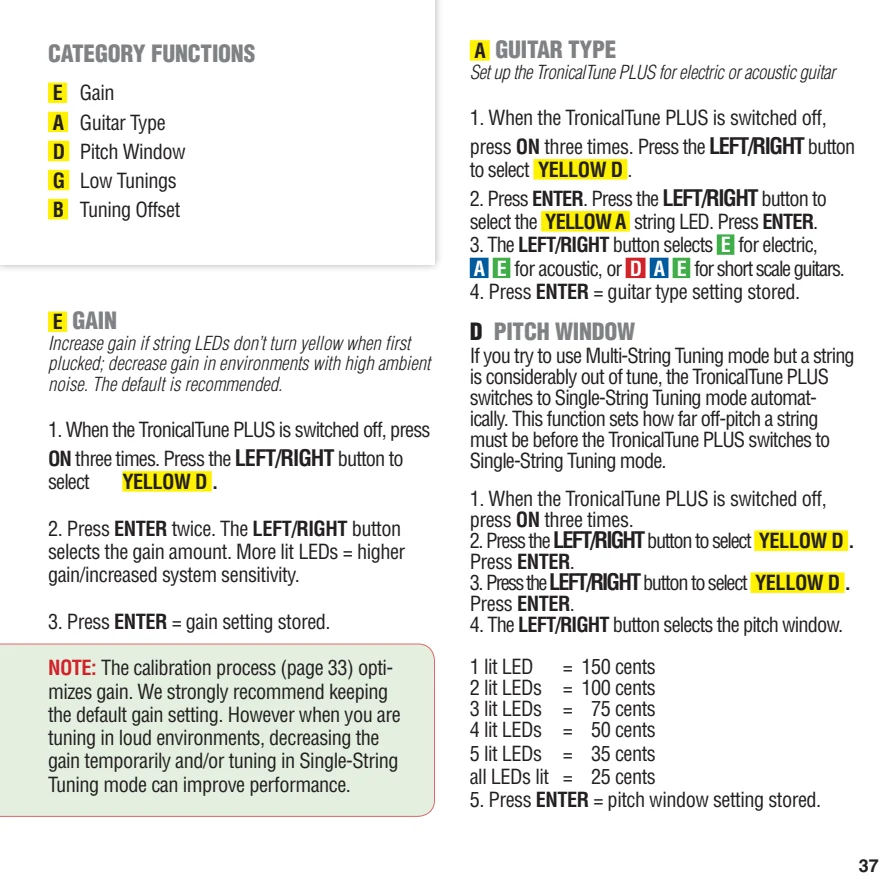
09 Set electric, acoustic, or short-scale guitarThe yellow A setting adapts the tuning behavior to electric, acoustic, or short-scale instruments. P. 37
The yellow A setting adapts the tuning behavior to electric, acoustic, or short-scale instruments.
- Press ON three times and select yellow D.
- Select yellow A and press ENTER.
- Choose E for electric, E+A for acoustic, or E+A+D for short scale.
- Press ENTER to store.
Good to knowThe factory default is electric guitar. Acoustic instruments should be changed explicitly.
 View source page ↗
10 Set the Pitch WindowPitch Window controls how far out of tune a string may be before Multi-String Mode automatically switches to Single-String Mode. P. 37
Pitch Window controls how far out of tune a string may be before Multi-String Mode automatically switches to Single-String Mode.
- Open the yellow software category.
- Select yellow D and press ENTER.
- Choose the window with LEFT/RIGHT: one lit LED is 150 cents; all LEDs is 25 cents.
- Press ENTER to store.
Good to knowA smaller window switches to Single-String Mode sooner.
View source page ↗
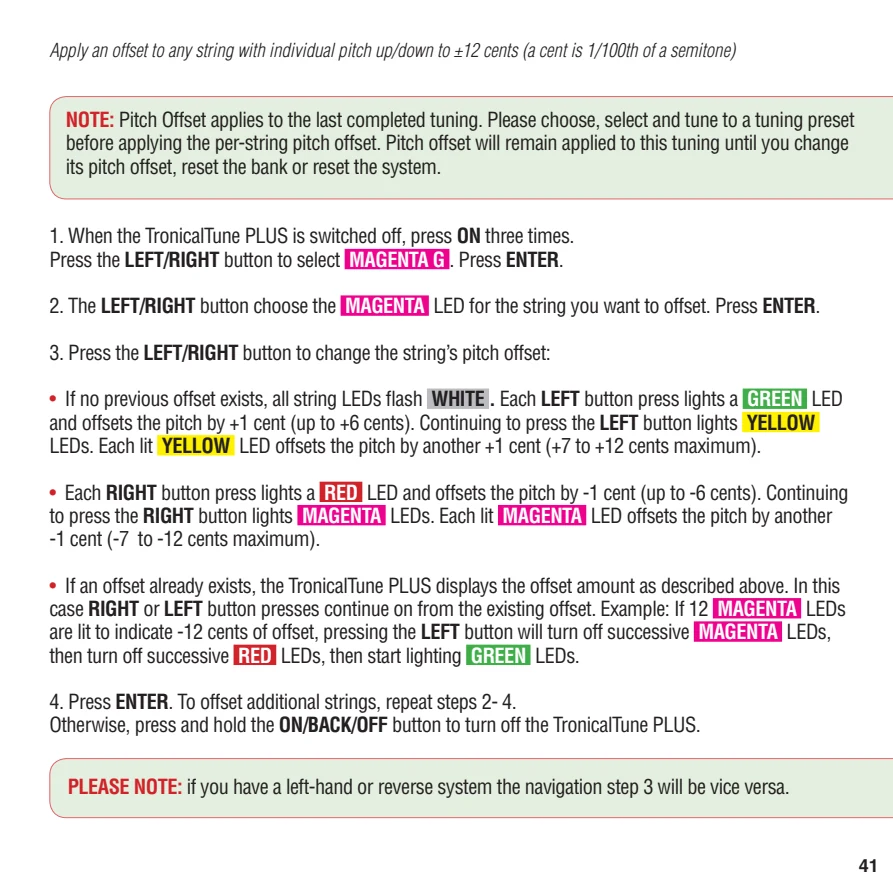
11 Correct the pitch of one stringPer-String Pitch Offset adjusts an individual string by up to plus or minus 12 cents for the last completed tuning. P. 41
Per-String Pitch Offset adjusts an individual string by up to plus or minus 12 cents for the last completed tuning.
- Load and complete the target tuning first.
- Press ON three times and select magenta G.
- Choose the string and press ENTER.
- Use LEFT/RIGHT for the offset, then press ENTER.
Good to knowOn left-handed or reverse systems, the LEFT/RIGHT direction is reversed.
 View source page ↗
Troubleshooting
4 topics
01 The wrong RoboHead movesIncrease the Interference Filter when one string causes a different RoboHead to move. P. 35
Increase the Interference Filter when one string causes a different RoboHead to move.
- Open the cyan advanced-hardware category.
- Select cyan B and press ENTER.
- Use LEFT/RIGHT to increase filtering.
- Press ENTER and test tuning again.
Good to knowVery high filtering can make the high e and B strings less reliable. Three or four lit LEDs are a useful starting point.
View source page ↗
02 The tuner does not detect a stringIncrease Gain if a plucked string does not make its LED turn yellow. In loud environments, reduce Gain or use Single-String Mode. P. 37
Increase Gain if a plucked string does not make its LED turn yellow. In loud environments, reduce Gain or use Single-String Mode.
- Calibrate first because calibration optimizes Gain automatically.
- If needed, open yellow D and select yellow E.
- Use LEFT/RIGHT to adjust sensitivity.
- Press ENTER and test again.
Good to knowThe factory/default Gain is recommended for most guitars.
View source page ↗
03 Tuning is slow or inaccurateStart with calibration, then adjust accuracy, speed, interference, or Gain only if the specific symptom remains. P. 33-37
Start with calibration, then adjust accuracy, speed, interference, or Gain only if the specific symptom remains.
- Tune to Standard E and run Calibration.
- If tuning is precise but slow, reduce Accuracy slightly.
- If neck movement affects pitch, lower RoboHead Speed.
- If the wrong motor moves, raise Interference Filter.
- If strings are not detected, review Gain or use Single-String Mode.
Good to knowRecalibrate after changing string gauge, string type, a firmware update, or a factory reset.
 View source page ↗
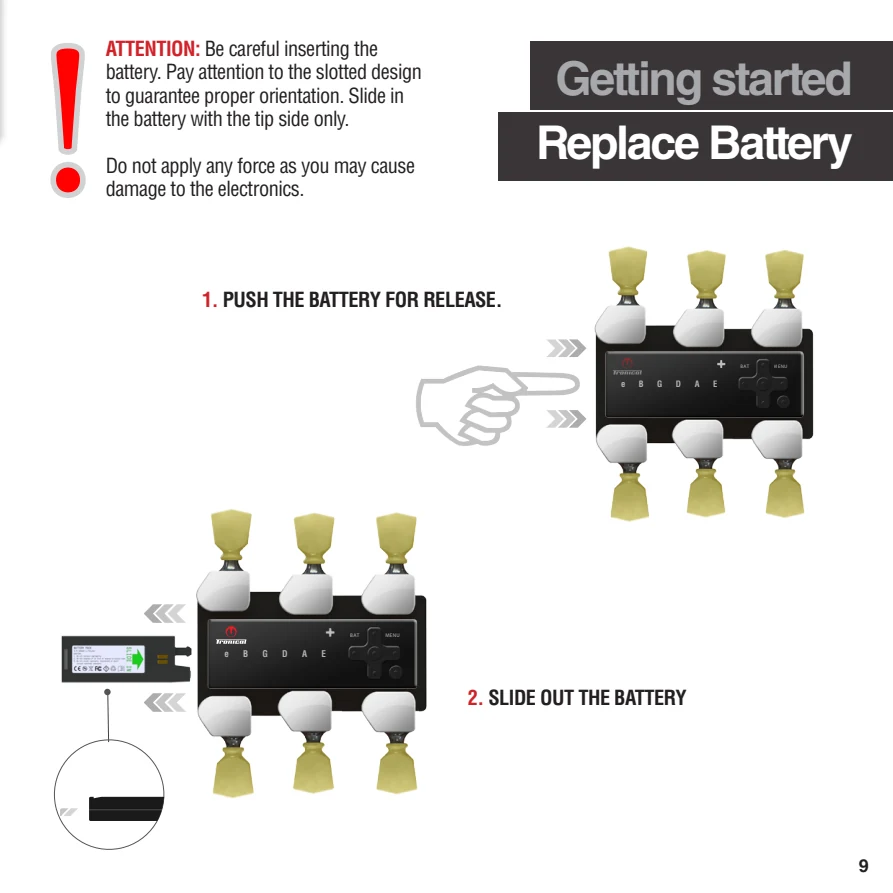
04 The system will not switch onFirst remove and reseat the battery in the correct orientation, then charge it with the supplied USB charging cable. P. 8-9
First remove and reseat the battery in the correct orientation, then charge it with the supplied USB charging cable.
- Press the installed battery to release it and slide it out.
- Check orientation and reinsert it tip-first without force.
- Connect it to the USB charging cable; its LED must light red while charging.
- When the cable LED switches off, reinstall the battery and press ON again.
Good to knowStop if the battery is swollen, damaged, unusually hot, or has been short-circuited.
 View source page ↗
Safety
1 topics
01 Safety and product careKeep TronicalTune dry, protect it from extreme temperatures and impact, and do not disassemble the electronics or battery. UPDATED
Keep TronicalTune dry, protect it from extreme temperatures and impact, and do not disassemble the electronics or battery.
- Disconnect the USB charging cable before cleaning.
- Use the cable and USB power source indoors and away from damp areas.
- Store the system dry and free from dust when unused.
- Recycle electronics and the LiPo battery through an appropriate collection point.
Good to knowKeep small parts away from children. Do not burn, crush, puncture, or short-circuit the battery.
DRYProtect from moisture
LiPoNo heat or short circuit
RECYCLEUse a collection point
Current safety summary · Manual 3.56